
Looking for a fun way to keep the kids busy? Why not get creative and help them try their hand at these awesome kids crafts:
Paper Rainbows

What You Need
- Craft Paper (in Rainbow colours)
- Scissors
- Stapler (and staples)
- Cotton Balls
- Ruler

Method
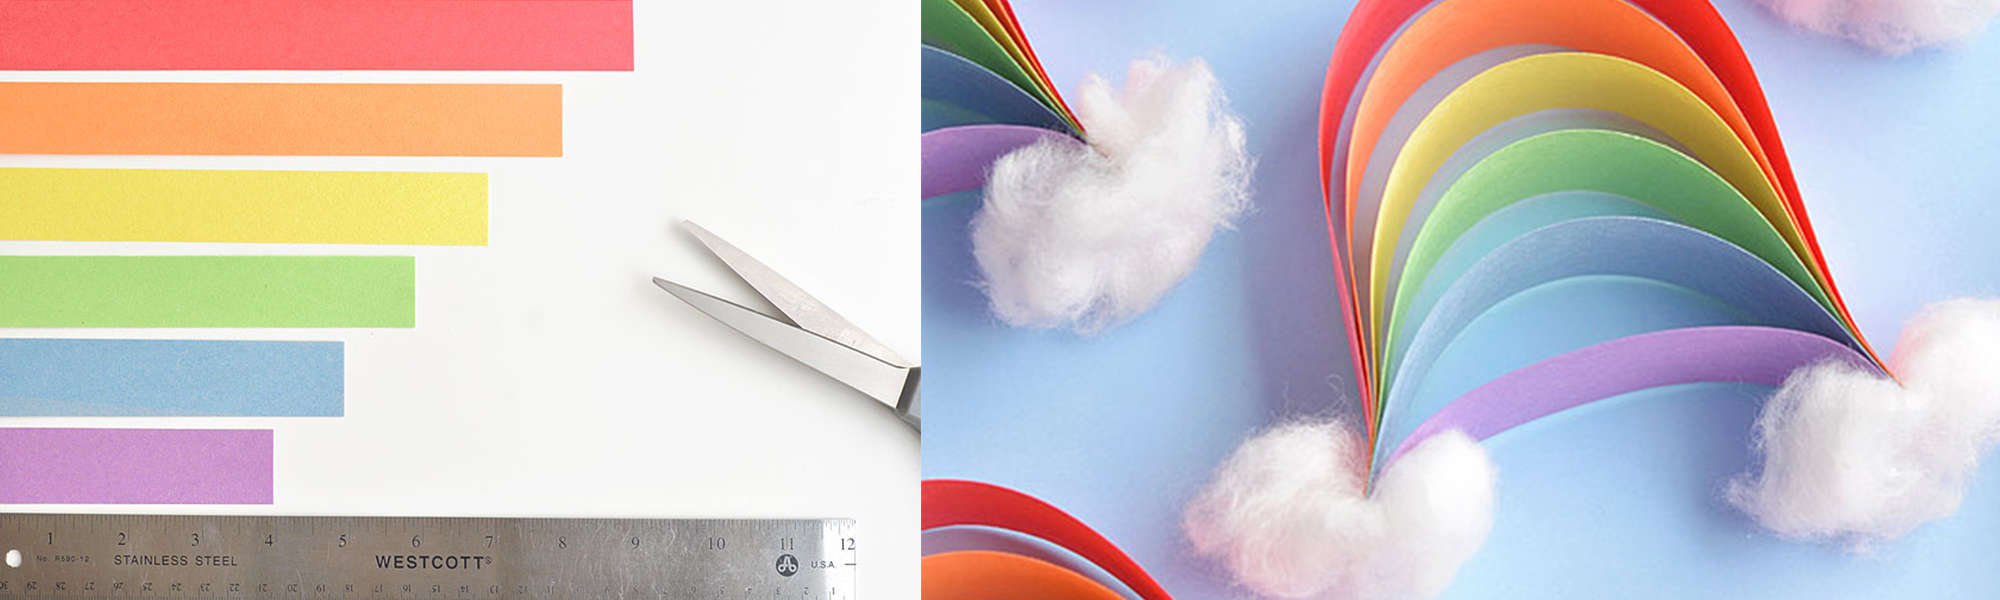
Cut a 2-3 cm strip from the short side of each piece of your coloured craft paper. You should now have 6 strips of each colour.
Line them up underneath each other (as pictured) in order shown. Using your ruler as a guide – trim each strip approximately 2 ½ cm (or 1 inch) shorter than the one on top of it.
Gather the strips of paper together, in order of the rainbow and size. Line up the ends, to make one side even, and staple them together.
Match the other ends up by starting with the shortest strip (purple) and lining it up with the blue strip. Add each strip to the gathered end, until all are in an even line. Staple them together. You will now see your rainbow shape take place.
To make your clouds: take a cotton ball and stretch it out / fluff it up to make a cloud shape. Repeat – to make two clouds.
Staple or glue a cloud to each end of your rainbow.
Noah’s Ark

What You Need
- A cardboard box
- Gift wrap tube
- Scrap of fabric (enough for your sail)
- Popsicle sticks
- Round takeaway container
- String
- Craft glue or double-sided tape
- Masking tape
- Coloured craft paper
- Scissors and small sharp knife (parental use only)
- Pencil

Method
*parental help required
Using a drinking glass, trace three circles on either side of the long edges of your box to create porthole window for the animals. The tricky part is cutting them out. *Parents – cut out the portholes with a small sharp knife.
Create your sails from scrap material, by cutting out two triangles (one slightly smaller than the other). You are aiming for the bottom of the sails to be half as long as the ship and as tall as the mast – aka – your wrapping paper roll, minus the height of the box (see picture).
Glue popsicle sticks to the bottom edge of your sails, fold this edge up and add more glue if needed to hide the popsicle sticks and create the ‘stiff’ edge to your sail- helping them stay in shape. You can also use double-sided tape for this step.
*To fix the sail to the mast, place a little masking tape on the top and bottom of your sails and then carefully cut a little hole through each with your scissors. The masking tape will help stop the material from fraying. Thread a bit of string through each hole and tie a knot. Fix the other end of the string to the mast, by wrapping it around a number of times, and again, tying a knot.
*Parents – cut a hole in the plastic container to hold the mast in place. Fix the mast and the container to the bottom of the box with masking tape. Cut a flap in the back of the box to act as a ramp for the animals to get onto the Ark if you like. Lastly create a small flag with craft paper to add to the top of the mast as a finishing touch.
Split-pin Robot
www.bkids.typepad.com
What You Need
- Corrugated cardboard in various colours
- Split pins in various colours
- Scissors
- Masking tape
Method
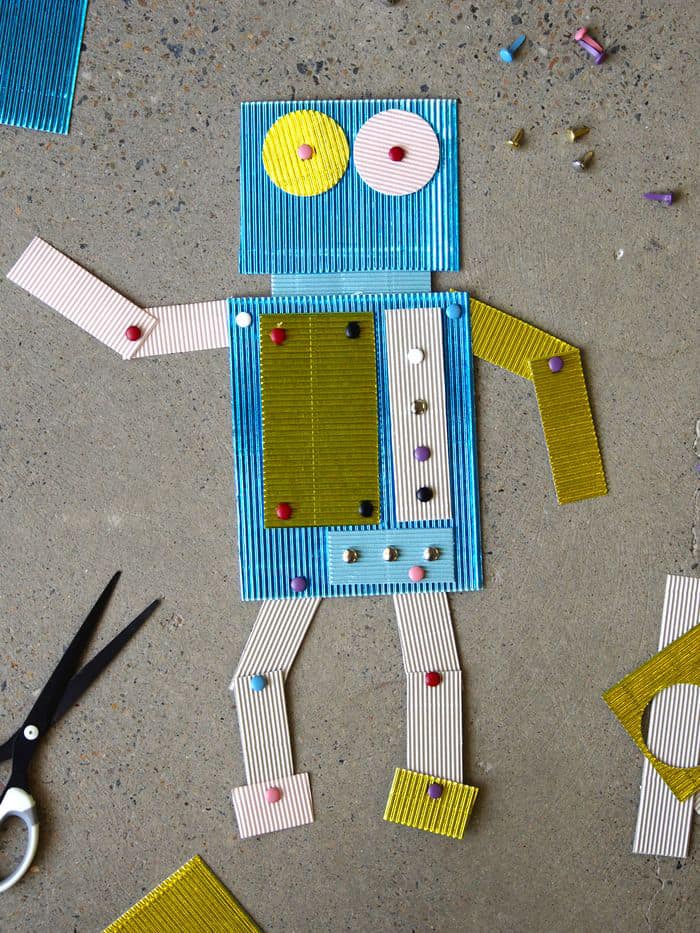
Cut out a fairly large rectangle (approximately 15cm x 10cm) from the corrugated cardboard to make your robot’s body.
Cut out some smaller rectangles from the other cardboard colours, to place on your robot’s body. These will be your robot’s ‘control panels’. Join them together with the split pins. Parents may want to first poke a little hole where the split pin is going with a large needle or point of a pair of scissors to make inserting the split-pins easier. Once threaded through, open up the end of the split-pin, to hold them in place. Remember your split-pins are acting as joints and buttons, so place them accordingly.
Cut a rectangle approximately 8cm x 6cm, for your robot’s head. Cut out two large circles for eyes and use split pins (acting as pupils) to attach them. To create the neck – cut another rectangular shape 6cm long and 4cm wide and attach to the bottom of the head and the top of the body (on the back) with masking tape.
Cut 8 strips of cardboard around 9cm long and 4cm wide. Join two pieces together with a split pin to make the robot’s arms and legs. Use another split pin to attach them to the robot’s body. Lasty you can add smaller rectangles on the bottom of the legs and arms – for feet and hands.